Wednesday, November 26, 2008

Free Tools for Civil 3D - Corridor EZY Lite

I've come across a site that offers some pretty cool software add-ons for Civil 3D, most of which are free. I don't have any affiliation with these folks, I don't help sell or demonstrate their products, but I can offer a few words on usability, feasibility and maybe some other abilities? Anyway, I'll start from the top.

The site, http://www.civil3dtools.com/ contains downloads of each add-ons that I'm about to present in this post and a few to follow. I'll include links to each individually also. The company who hosts civil3dtools.com is CadApps and they are an Authorized Autodesk Developer. If you visit their website, you can download and view AVI's of some of this stuff in action.

First on my list is CorridorEZY. EZ is right. I'll admit that designing and modeling an intersection or cul-de-sac in Civil 3D can be cumbersome, to say the least. Well, CorridorEZY can hopefully alleviate some of that pain. You can read what Angel Espenosa of Autodesk thinks about CorridorEZY also over at his blog Angel's Civil 3D Thoughts, I have a link in the sidebar for his blog, or you can visit his "Nothing Up My Sleeve" post about Corridor EZY here.

Please note also that I am running the Lite version of CorridorEZY, it's a free download but will only have commands for Intersection design unlocked. You have to pay for the full version in order to get Cul-de-Sacs and Roundabouts. I think you'll find that the free version is pretty amazing on it's own.

On to the software. First, I want to tell you that this VBA add-on runs all of the time. So once it's installed, Civil 3D will continue to try to use it. So if you need to create a corridor and don't want to use CorridorEZY to design it, you'll have to turn the software off, which is very simple. In the Utilities portion of the menu that it creates you'll find the Stop Software command. Then you're good to go. So what I've done is create a copy of my original workspace and added the CorridorEZY menu to it. So when I'm going to use CorridorEZY tools, I just turn the Software off before I switch back to my normal workspace.

It should also be noted that EZY will require a surface and centerline alignments. After that, it pretty much does the rest for you. You can use existing assemblies or create assemblies using the EZY editor. It feels a little like Land Desktop for creating templates, just FYI.

If you're using the same assembly for the through road as you are for the intersecting roads, you only need one assembly. After the assembly has been taken care of, you'll create roads out of your alignments. It's a simple process where you tell EZY what alignment your through road is and what alignment your intersections are and it creates "roads". During this process, existing and proposed profiles are created automatically. You'll choose the Civil 3D style to use for each as well as the band set to use for the profile view, when your finished, all of your profiles will be created. EZY has it's own profile editor that can be used to manipulate the profile, but it's not needed. You can modify the profile anytime using the Civil 3D profile editing commands.

So after you've picked the alignments and created roads from them, you can create the curb returns. Keep in mind that CADApps is an Austrailian company, so our Curb is their Kerb. There are a few things like that throughout the software, but it's easy enough to translate.
Curbs are super easy with EZY. Pick a button and pick a location near the return and EZY will pop up it's editor to give you a hand. It will automatically create the alignments and profiles for you, or you can choose your own.


The image above is a screenshot of my first intersection. The cross sections along each cl alignment were created when the roads were defined. The alignments and cross-sections of the curbs were created when I picked locations and defined the curb returns.


So far, aside from surface and alignment creation, about 2 minutes worth of work. Not bad. If your not interested in the corridor, but just need a surface, you can build the surface now and start creating cross sections. If you do need a corridor, you can let EZY build it for you, but as I understand it, you'll have to tie the intersections together, I haven't gotten that far yet.

Remember, I've done essentially no work. I even used my own subassembly, not created with EZY. So then I auto-generated a surface, the screenshot below is the result.


Another awesome feature, and one the Angel mentions in his blog, is that EZY links the crossing roads to the main road, including curb returns. This means that if you adjust the main road elevations, the side roads and curb returns are adjusted to match!

Go download EZY and play with it yourself. I'll bet you'll be looking for the full version in no time!

http://www.civil3dtools.com/
Thursday, October 23, 2008

Quickies - Commands That May Come In Handy

Today I thought I'd list out some commands that may be helpful to you while working with 2009 AutoCAD products.


In Civil 3D, you have the ability to assign a coordinate system to the drawing. When you do this in 2009 a glyph will appear on screen, this is the geomarker.


From the help file....

The geographic marker is a visual representation of the location information and is created at the specified point on the drawing.


So, to disable this marker, use the GEOMARKERVISIBILITY command. A setting of 0 will turn the marker visibility off.


Also in Civil 3D - Use the SHOWDRAWINGTIPS command to display marker lines along your alignment and profile. When hovering an alignment, a reference line will show up on the profile and visa-versa. If you get sick of em', use the HIDEDRAWINGTIPS command.


In general AutoCAD (and any AutoCAD based application), I have a few commands that you may find useful.


LAYERDLGMODE: Setting this variable to 0 will cause the Layer Manager Palette to return to pre-2009 form, a dialog box.


MENUBAR: Setting this variable to 0 will turn off your menubar. In 2009, the Menu Browser contains all of your menus, so if you'd like to save some real-estate, turn off the menu bar and start training yourself to use the menu browser!


MEASUREINIT: This variable tells AutoCAD to use Imperial units, meaning Imperial hatch patterns and linetypes or Metric. A setting of 0 tells AutoCAD to use Imperial, 1 is Metric.


BROWSER: Type this command and press enter twice to go to the Autodesk website with your default web browser, type the command and press enter once, then you can enter your own web address into the command line and press enter. Your default web browser will open to the page you enter.


Monday, October 6, 2008

Starting Hydraflow within Civil 3D

By default you have to double-click the hydraflow application you wish to start via a shortcut - usually on the desktop. For some, this is very acceptable, either they don't use Civil 3D and only use Hydraflow, or they use Civil 3D and don't care about Hydraflow.

If you're in the middle and your inside of Civil 3D wanting to open Hydraflow, you have to minimize Civil 3D before launching Hydraflow. I'll offer a quick tip to fix that, here is how I'm opening Hydraflow within Civil 3D.

First, there is no command for Hydraflow, let alone seperate commands for each extension. Knowing AutoCAD, we know that in order to do anything, a command is needed to execute the action you want to take. As mentioned, Civil 3D has nothing in the way of Hydraflow commands, so we're starting from the ground. A little (little should be stressed here) programming is in order to define the commands needed to launch Hydraflow within Civil 3D.

If you're not LISP savvy, and I'm not, you can search around online to find resources to help you along, a great resource for everything lisp and CAD Management is Robert Green's site http://www.cad-manager.com/ . Check it out when you can, for now I'll copy my code here so you can just paste it into a notepad file and get moving.

Once we tell Civil 3D (via lisp) to define our new commands, we can create commands in the CUI that reference our lisp commands.

The lisp code I used for Storm Sewers is as follows:

(defun c:hstm ()
(startapp "\"C:\\Program Files\\Hydraflow Storm Sewers Extension for AutoCAD Civil 3D 2009\\Storm2009.exe\"")
(princ)
)

Line by line definitions:

Line 1: Defun = Define Function, we're defining a command, that command is HSTM, that is what I called it, you can call it whatever you want.

Line 2 & 3: AutoCAD already has a command called startapp for Start Application, use this to navigate to the .exe file you want to run.

Line 4 & 5: Needed to to close the lisp. You'll always see the (princ) at the end of a lisp. I don't know why, it's just always there! If you know, leave a comment and fill me in!

I followed this format with each extension, giving me three new commands. Here are the other lisp files:

Hydrographs:

(defun c:hydro ()
(startapp "\"C:\\Program Files\\Hydraflow Hydrographs Extension for AutoCAD Civil 3D 2009\\Hydro2007.exe\"")
(princ)
)

Express:

(defun c:hexp ()
(startapp "\"C:\\Program Files\\Hydraflow Express Extension for AutoCAD Civil 3D 2009\\HydraflowExpress.exe\"")
(princ)
)

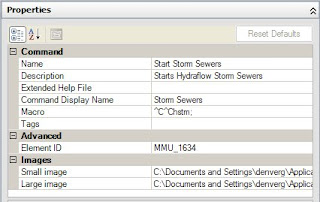
Once those are created and loaded (I just loaded them into my Startup suite, so each drawing that opens loads them) you have a choice. You can run the commands as they are, limiting you to entering the commands at the command line, or you can make buttons out of them and add them to a menu. I've added mine to a Hydro menu I created. Since the command list won't show the newly created commands, you'll have to add them.


I've pasted the contents of the storm sewers command above. From that, hopefully you can figure the other two out. Once there is a command is there, you can add it to a toolbar or menu or even a ribbon panel.


AutoCAD Tools in Civil 3D


So many of us are used to AutoCAD. Sometimes, we're so familiar with AutoCAD that finding commands and utilities can be difficult unless those AutoCAD menus are present.

It's not too difficult to turn AutoCAD menus on in Civil 3D, but if you turn all of AutoCAD on, still have all of Civil 3D turned on, then maybe toss in Raster Design or Trimble Link your menu bar is two lines, taking up more space!!!

What I'm proposing - consolodate. You don't need to have those AutoCAD menus showing all the time, you just need them to be available when you DO need them - so....

Create a new menu in the Civil 3D CUI and copy/paste the AutoCAD menus into it.

What do you think?

Friday, September 5, 2008

Trimble Link for Civil

Well, after realizing that Trimble Link only installed on AutoCAD Civil 3D (3D being of importance) I contacted Trimble and we worked out a new version of Trimble Link with one of our customers who needed the link, this one for AutoCAD Civil. As of now, Trimble doesn't have a download on their site, anyone who needs it can contact me and I'll set you up with the .exe file. I hope all is well!

See ya-
Denver
Update: Trimble has this on their site now, here it is:

Thursday, September 4, 2008

Subscription Rewards

If you're a subscription customer, you have some downloading to do. Autodesk has recently released some new tools to subscription customers for AutoCAD, Map 3D and Civil 3D, shall we dig in and see what's in the goodie bag?

AutoCAD 2009 Subscription Bonus Pack

I don't know why, but bonus tools make me think of express tools, probably because they used to be bonus tools, Autodesk has never been good with names. I think a lot of you have been saying for years that Autodesk should just release updates to the products instead of having to install a whole new product every year. Your wish has been granted.

These tools are from the AUGI Wishlist, so instead of waiting for AutoCAD 2010, you can download them now. Here is a little of what is available:
  1. New measurement capabilities
  2. SPLINE to PLINE
  3. Reverse PLINE edit
  4. Rotating viewport and have the view rotate with the viewport
  5. Erase unreferenced unnamed objects
AutoCAD Map 3D 2009 Industry Toolkits

The Water Industry Toolkit for Map 3D 2009 helps planners, drafters, engineers, and designers working on water, wastewater, or electric system networks enhance productivity and support data standardization by leveraging AutoCAD Map 3D’s Object Classification functionality.

Three toolkits are available, they contain pre-configured symbols and templates specific to the industries of Water, Wastewater, and Electric.

AutoCAD Map 3D 2009 Survey Tools

The Surveying Tools Extension for Map 3D 2009 helps planners, drafters, engineers, and designers better utilize survey, GPS and LIDAR data to create surface models and use point data in AutoCAD Map 3D 2009. The Surveying Tools provide:
  • Improved point data support.
  • Surface creation capabilities.
  • Additional Coordinate Geometry (COGO) commands (Bearing/Bearing and Distance/Distance).
  • Import and export support for LandXML.
  • Preview Application Programming Interface (API).
  • User documentation including User’s Guide and Developer’s Guide.
Log into the Subscription website and download these functionality enhancements for AutoCAD and Map.
See ya -
Denver

Wednesday, September 3, 2008

2009 Updates - Go Get Em'

If you're using AutoCAD 2009, you should install Update 1, it's here:
AutoCAD 2009 Update 1

If you're using AutoCAD Civil 3D 2009, you should install Update 1, it's here:
AutoCAD Civil 3D 2009 Update 1

If you're using AutoCAD Civil 3D Land Desktop Companion, you should think about using Civil 3D!
AutoCAD Civil 3D Land Desktop Companion 2009 Update 1

If you're using AutoCAD Land Desktop 2009 - AND YOU DON'T HAVE THE COMPANION, you should upgrade to Civil 3D, in the meantime, you can download the update here:
AutoCAD Land Desktop 2009 Update 1

If you're using AutoCAD Map 3D 2009, you should install Upate 1, it's here:
AutoCAD Map 3D 2009 Update 1

As always, read the Readme file before installing and follow the directions. Otherwise you may have to scrap the whole thing and start over - it's easier to do it right the first time!

See ya -
Denver

Civil for AutoCAD

Welcome to the Civil for AutoCAD blog. My name is Denver Galloway and I'm an Application Engineer for Mid-West CAD, an Autodesk Reseller in the Kansas City metro area. Over the past few years I've been training and supporting AutoCAD and Civil 3D and consulted on various Civil 3D and Vault Implementations.

I'd like to use this blog to share what I've learned about AutoCAD and Civil 3D. Hopefully you can add this blog to your list of helpful resourses and references when managing your CAD enviornment. I'll also be posting update announcements pertaining to Civil 3D and AutoCAD and any other useful information about the products that I'm allowed to share.

I welcome any comments and suggestions any readers have and encourage your interaction. I look forward to hearing from you!

See ya -
Denver